Showing posts with label tutorial. Show all posts

Saturday, January 18, 2014

Tutorial: Pine Cone and Acorn adornment

How cute are these?!


And with this easy peasy tutorial, you can make a collection of your own little adornments. These can be hung up anywhere in the house to add a little whimsy, or decorate next year's Christmas tree with handmade charm.


What you need:

Acorns
Pine cones
Thread or string
Sewing needle
Drill with small bit
Acrylic paints and paintbrush
Elmers type glue
E-6000 glue

Pick a beautiful sunny autumnish day and take a walk outside. Keep an eye out for acorns with their tops and any pine cones. Its OK if the pine cones are closed, we will open them later...

After your nice stroll, empty your pocket full of gritty treasures into a colander and rinse that dirt off. Then set  the oven for 200 and place your haul on a cookie sheet and "bake" until the pine cones open. (careful to not burn them!) This should not take more than 15 min.


Detach the top of an acorn and paint the nut any color you like. I use acrylic paints. 


While that's drying, Drill two small holes through the top of the acorn "hat" 


one more to go...


Now thread your needle with whatever string or floss you want to use. Note: make sure that the hole you just drilled is big enough for the fiber and needle to fit through. 


Tie a knot at the end of your string and feed it through the first hole until it stops at the knot.  Tie another knot in the middle of the string leaving enough play to hang your decoration then cut the string. 


Fill the cavety of your acorn top halfway with E-6000 glue and place it back on your painted acorn. Let it sit for a few hours to harden. 


I used this clamp as a platform so that the acorn had a place to sit upright. 


Once sturdy, I sealed the paint with some Elmer's type glue.


 Don't forget to wash out your gluey brush before it dries! 


Once dried, you are ready to hang your acorn anywhere! 

Oh wait!! You thought I forgot about the pine cone, didn't you! I saved the easiest for last. 


Just paint the tips of your acorn any combination of your favorite colors. Then drill a hole in two of the top tips. (not the tippy top tip though)  and repeat the same string and needle steps as the acorns....voila! 

Where will your baubles find their new home? 


Don't have the time to make these on your own?  No problem! You can buy them here on my web site: www.sunshynesilverwear.com for just $3 each! 

Are you working on any fun projects to get over the winter blahs? Please feel free to share them here! 


Monday, February 28, 2011

Do it. Live it. Teach it.

In addition to introducing and exploring the creativity of the artists in my life, once a month I am going to take the time to share new ways I am making my life more Eco-friendly.  Some easy, simple things anyone can do to make the world a 'Greener' place. I'm calling this segment 'Do it. Live it. Teach it'
~~~~~~~~~~~~~~~~~~~~~~~~~~~~~~~~~~~~~~~~~~~~~~~~~
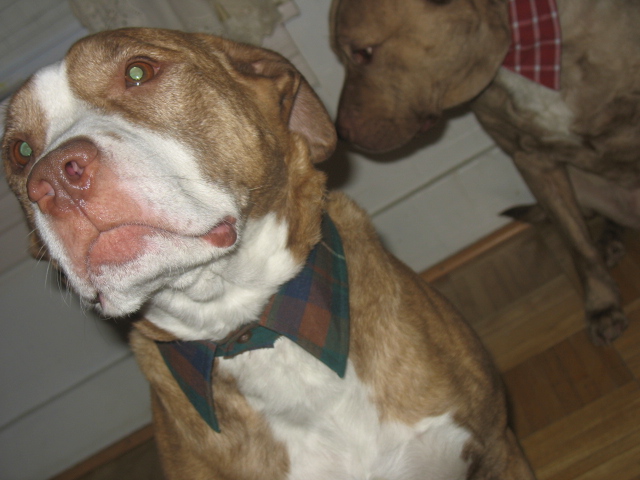
For my first installment, I would like to show you how i made this cute, fashionable dog collar out of an old button up shirt. I found this fun tutorial on Sew Doggy Style Blog. I thought it was so cute I had to share it AND it is SO simple. The only things you need are:

~ An old button up shirt with a collar. This project is made extra easy if the collar has a button already on it like the one i am using.  (best to try the collar on Fido before you cut it up to make sure that it will fit)

~ A bottle of Fray Check. This is used to stop fabric from fraying. (this can be found at any craft store. I got   mine at Joanne Fabrics for $1.50 with their online 50% off coupon.)

~ A pair of scissors

~ And of course an adorable model for your finished project.

The shirt I chose to use was found in the back of my closet. It was used while painting my hallway years ago so unfortunately cannot be donated, but will be *PERFECT* for this project.

Step 1.
Cut the collar right off of the shirt.

Step 2. 
Use the Frey Check on the cut you just made. 

Step 3.
Oh wait, there is no step 3...your project is finished! (see, wasn't that simple)
Now for the fashion show...
I know some of you out there who dont have a dog are thinking that this tutorial wont do you any good. Well THINK AGAIN! These cute collars also can also spruce up a child's old teddy bear, they make GREAT GIFTS for the dog lover in your life, or hell, spice up your love life by surprising your significant other by wearing the collar (and ONLY the collar) The possibilities are endless....;)
 *****************************************************************
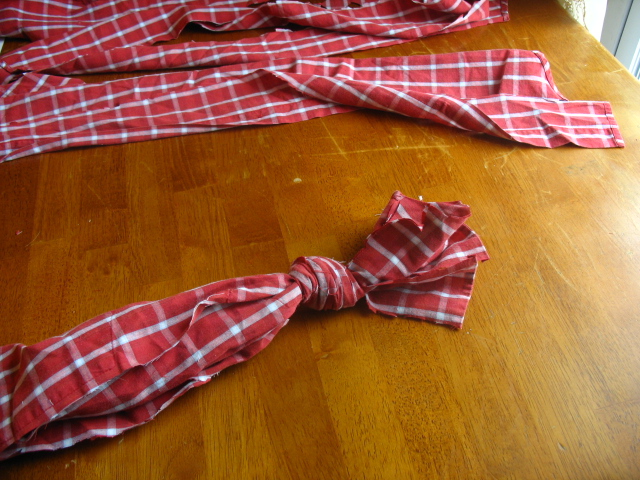
As for the rest of the shirt, I up-cycled it by making it into 2 chew toys for my 2 good doggies. 
First, I took out all of the buttons. (and put them in my 'pile o craft supplies' for later use) then cut the shirt into 12 long strips, 6 strips for each toy.
Tie 6 strips together, leaving about 4 inches of cloth at the end.
After that, I just braided the strips and tied another knot leaving 4 inches of cloth at the other end and VOILA! A handmade toy your canine companion is sure to love.

Best part is, you just saved yourself at least $20 by making these items yourself rather than buying them at the big box pet store.  What could be better than being green while saving some green?